RRUR01.7 | Anderic Universal 4-in-1 Remote Control pre-programmed to Roku User Guide
This article applies to the Anderic RRUR01 Universal 4-in-1 Remote Control.
Note: This RRUR01 (Latest version: RRUR01.7) is identical in programming with the Anderic RRU401 4-Device universal. The only difference is that the default codes are preprogrammed for use with Roku devices, and the media keys are assigned a punch-through feature by default. The code list is shared with the RRU401.

Documentation
- Keymaps and code diagrams
- RRUR01.7 Programming Instructions (Printable PDF)
- RRUR01.3 Operating Manual (PDF)
- RRUR01.2 Operating Manual (PDF)
- RRUR01 (PDF)
- Code List
Works for the following Roku Streaming boxes (No Roku Sticks):
Note: When operating, the RRUR01 requires direct line-of-sight with your Roku box.
1st Generation (2010)
- N1000 – Roku HD
- N1100 – Roku HD-XR
- N1101 – Roku SD
- N1102 – Roku HD
- N1103 – Roku XD
- N1104 – Roku XDS
2nd Generation (2011)
- 3000 – Roku 2 HD
- 3050 – Roku 2 XD
- 3100 – Roku 2 XS
- 2400 – Roku LT
3rd Generation (2013)
- 4200 – Roku 3
- 2720 – Roku 2
- 2710 – Roku 1
4th Generation (2015)
- 4400 – Roku 4
5th Generation (2016)
- 3700 – Roku Express
- 3710 – Roku Express+
- 4620 – Roku Premiere
- 4630 – Roku Premiere+
- 4640 – Roku Ultra
6th Generation (2017)
- 3900 – Roku Express
- 3910 – Roku Express+
- 4660 – Roku Ultra
7th Generation (2018)
- 3920 – Roku Premiere
- 3921 – Roku Premiere+
- 4661 – Roku Ultra (with JBL headphones)
8th Generation (2019)
- 3930 – Roku Express
- 3931 – Roku Express+
- 3920 – Roku Premiere (continued)
- 4662 – Roku Ultra LT
- 4670 – Roku Ultra
9th Generation (2020–2021)
- 3940 – Roku Express 4K
- 3941 – Roku Express 4K+
- 4800 – Roku Ultra
- 9102 – Roku Streambar
10th Generation (2021)
- 4662 – Roku Ultra LT (updated)
- 3930S3 – Roku LE (Walmart exclusive)
11th Generation (2022–2023)
- 3960 – Roku Express (2022 refresh)
- 3940X2 – Roku Express 4K (2023)
- 3941X2 – Roku Express 4K+ (2023)
12th Generation (2024–2025)
- 4802 – Roku Ultra (2024)
- 3942 – Roku Express 4K+ (2025)
- The Anderic RRUR01 is pre-programmed to work Roku Streaming Players and Roku TV's with Line-of-sight (IR) without any programming.
- This 4-device universal and can be programmed to your Roku TV or any other brand TV. You can program to any audio device such as: Soundbars, A/V Receivers, etc. It can also pair with set-top boxes such as cable, satellite (DIRECTV), DTA, DVD, VCR, Etc.
- Remote is already pre-programmed for your Roku streaming players (Ultra, Premiere, Premiere+, Express, etc.) and Roku enhanced TVs.
- If it doesn’t work your Roku TV or streaming player, please follow instructions to get it programed.
- NOTE: The Number-pad and Channel Up/Down WILL NOT function if your Roku doesn't support it. All other functions will work using the purple buttons.
- NOTE: Will not work Roku Streaming Sticks nor will do RF functions such as Voice or Headphones.
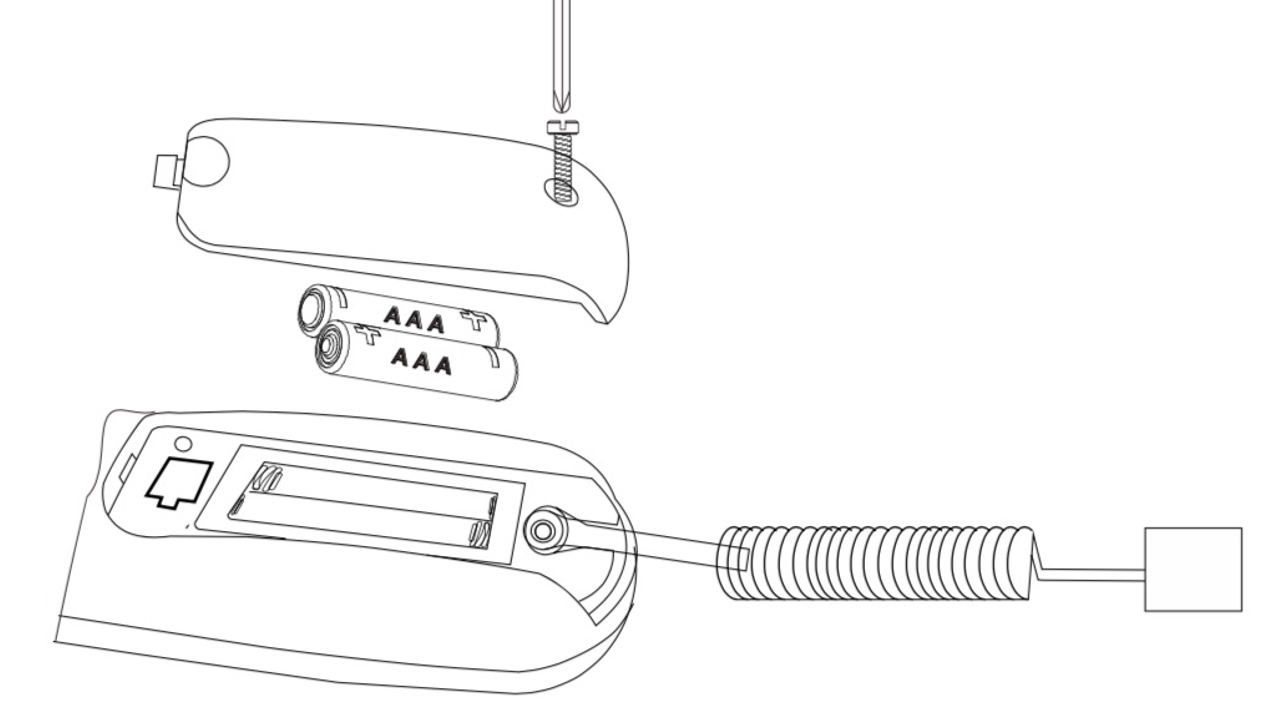
Installing the Batteries, Screw and Cable attachment (Sold Separately)
See below diagram for help with installing the batteries, battery cover, screw, and cable attachment.
Programming – Code Input Method
This method allows for programming the remote using codes from the attached code list.
- Turn on the device you want to control.
- Find the corresponding brand code from code list below, and write down.
- TV:__ __ __ __ DVD: __ __ __ __ STB: __ __ __ __ AUDIO: __ __ __ __
- Press and hold the mode key (e.g., TV) you wish to program for about 3 seconds until the mode light remains on, release the mode key.
- Input the 4-digit code from code lista. If valid - Mode key light will go out directly.
b.If invalid - Mode key will blink three times quickly and go out, please try inputting the code again.
- (TEST) Check to see if most of the keys work to the control your device, if not, please try another code under the same brand & repeat all steps. You may also try “Auto code search method” or “One button search method” below.
Note: During the programming mode, not pressing any button for 20 seconds will cause remote to exit programming mode.
Note: Red, Green, Yellow, Blue buttons may do additional apps shortcuts for your Roku. If you have a specific shortcut such as Disney + you need. You can simply learn the key from original remote to any key on RRUR01. See learning instructions below.
Quick Codes for Roku Devices
Element - 2726, 2802, 2804
Haier - 2783, 2823
Hisense - 2722, 2782, 2804, 2847, 2848, 2726, 2802
Hitachi - 2803, 2806, 2814, 2815, 2816, 2818, 2819, 2821, 2822, 2826, 2833, 2847, 2849
Insignia - 2723, 2724, 2752, 2805, 2807, 2808
JVC - 2726, 2848
LG - 2848, 2726, 2654
Magnavox - 2654, 2829, 2813, 2848
ONN - 2726, 2802, 2804, 2848
Philips - 2726, 2802, 2804, 2848
Proscan - 2726, 2802, 2804, 2848
RCA - 2726, 2802, 2804, 2848
Roku Player - 2730, 2851, 5246 (Must use (STB) mode)
Sanyo - 2726, 2802, 2804, 2848
Sharp - 2725, 2733, 2780, 2781, 2809
TCL - 2654, 2802, 2726, 2802, 2804
Westinghouse - 2726, 2802, 2804, 2848
Programming - Auto Code Search Method
Allows for programming without codes by scanning through all codes in the database.
- Turn on the device you want to control.
- Press and hold the mode key (e.g., TV) you wish to program for about 3 seconds until the mode light remains on, release the mode key.
- Press [CH+] or [CH-] key and release, it will search forward or backward.
- When the device powers off (or video starts playing), press [POWER] key to save and exit (During searching, you can press key [CH+] or [CH-] to change searching direction, and if press any other key, it will exit from searching mode).
Code display
Use this method to display the code that is programmed.
- Press and release the mode key you would like know code for (e.g., TV).
- Press key “[MENU]” and “[1]”, the Mode key flash times indicate the first digit of the code.
- Press key “[MENU]” and “[2]”, the mode key flash times indicate the second digit of the code.
- Press key “[MENU]” and “[3]”, the mode key flash times indicate the third digit of the code.
- Press key “[MENU]” and “[4]”, the mode key flash times indicate the fourth digit of the code.
NOTE: If the current digit is 0, the mode key will not flash.
Multi-mode Combine Power
When enabled, this feature allows for powering on/off multiple devices with a single press of the POWER button.
Enable - Multi-mode Combine Power
- Press and hold any mode key (e.g., TV) for about 3 seconds until mode key lights and remains on, release the mode key.
- Input code "9 9 8 0". Mode key remains lit.
- Press all mode keys (i.e., TV, STB, DVD) you wish to enable multi-mode combine power.
- Press [POWER] key to save and exit.
Disable - Multi-mode Combine
- Press and hold any mode key (e.g., TV) for about 3 seconds until mode key lights and remains on, release the mode key.
- Input code "9 9 8 0". Mode key remains lit.
- Press [POWER] key to save and exit, Mode key blinks two times and goes out.
Device mode lock
When enabled, this feature allows for locking a device mode so that it cannot be re-programmed. It can is used as a safety feature for accidental programming. If enabled, device lock must be disabled first before mode can be programmed again.
- Press and hold the mode key (e.g., STB) you wish to enable/disable device mode lock for, for about 3 seconds until mode key lights and remains on, release the mode key.
- Input code “9 9 8 1”.
- If enabled - The mode light goes out directly
- If disabled - The mode light blinks two times
Channel Punch-through
When enabled, all channel keys: 0-9, [-], [RECALL],[CC], [SAP], [CH +]&[CH -] will always send the code of mode assigned, no matter what mode the remote currently resides. Example: After programming channel punch-through to STB mode, if remote is presently in TV mode when pressing a channel key, remote will send the code for STB instead of TV.
- Press and hold the mode key (e.g., STB) you wish to enable/disable channel punch-through for, for about 3 seconds until mode key lights and remains on, release the mode key.
- Input code “9 9 8 2”.
- If enabled - The mode light goes out directly.
- If disabled - The mode light blinks two times.
Volume Punch-through
When enabled, all volume keys: [MUTE], [VOL+]&[VOL-] will always send the code of mode no matter what mode the remote currently resides.
- Press and hold the mode key (e.g., TV) you wish to enable/disable volume punch-through for, for about 3 seconds until the mode key lights and remains on, release the mode key.
- Input code "9 9 8 3".
- If enabled - The mode light goes out directly.
- If disabled - The mode light blinks two times.
Media Punch-through
When enabled, all media keys: [STOP], [RECORD], [<<], [|<<], [PAUSE], [>>|], [>>], [PLAY] will always send code of mode assigned, no matter what mode the remote currently resides.
- Press and hold the mode key (e.g., DVD) you wish to enable/disable media punch-through for, for about 3 seconds until mode key lights and remains on, release the mode key.
- Input code “9 9 8 4”.
- If enabled - The mode light goes out directly.
- If disabled - The mode light blinks two times.
Roku® Punch-through (+ D-Pad)
When enabled, all Roku related keys: [EXIT] (), [<<], [PLAY],[PAUSE], [>>], INFO, [HOME],[REPLAY], [NETFLIX], [UP], [DOWN], [LEFT], [RIGHT]&[OK] will always send code of mode assigned, no matter what mode the remote currently resides.
- Press and hold the mode key (e.g., STB) you wish to enable/disable Roku punch-through for, for about 3 seconds until the mode key lights and remains on, release the mode key.
- Input code "9 9 7 0".
- If enabled - The mode light goes out directly.
- If disabled - The mode light blinks two times.
Roku Punch-through (NO D-Pad)
When enabled, all Roku related keys: [EXIT] (), [<<], [PLAY],[PAUSE], [>>], INFO, [HOME], [REPLAY], [NETFLIX]will always send code of mode assigned, no matter what mode the remote currently resides.
- Press and hold the mode key (e.g., TV) you wish to enable/disable Roku punch-through for, for about 3 seconds until the mode key lights and remains on, release the mode key.
- Input code "9 9 7 1".
- If enabled - The mode light goes out directly.
- If disabled - The mode light blinks two times.
All-Key Punch-through
When enabled, all keys will always send the code of mode assigned, no matter what mode the remote currently resides. Note: All-Key Punch-through has the lowest priority amongst all punch-through types. You may enable other punch-through modes to work alongside and they will have higher priority.
- Press and hold the mode key (e.g., TV) you wish to enable/disable all-key punch-through for, for about 3 seconds until the mode key lights and remains on, release the mode key.
- Input code "9 9 7 3".
- If enabled - The mode light goes out directly.
- If disabled - The mode light blinks two times.
Individual Key Punch-through
Individual Key Punch-through allows for individually assigning keys to “punch-through” to the mode of your choosing. After enabling punch-through to a given key, the key will always send the code to the assigned device no matter what mode the remote currently resides.
Note: Individual Key Punch-through has the highest priority amongst all punch-through types.
Enable - Individual Key Punch-through
- Press and hold any mode key (e.g., TV) for about 3 seconds until mode key lights and remains on, release the key.
- Input code “9 8”,
- Press the corresponding key you wish to enable punch-through for,
- Press the mode key you want to assign it to (e.g., TV, STB, AUX); mode light goes out directly.Note: To re-assign a key to a different mode, just repeat steps 1-4.
Disable - Individual Key Punch-through
- Press and hold any mode key (e.g., TV) for about 3 seconds until mode key lights and remains on, release the key.
- Input code “9 0 0”,
- Press the key you want to disable the punch-through for; mode light blinks two times to confirm.
Learning function
Learning allows for programming of individual keys using your existing remote's codes.
- Press and hold the mode key (e.g., TV) you wish to program for about 3 seconds until the mode light remains on, release the mode key.
- Press and release [MENU] key, the mode key blinks slowly, the remote is now in learning mode.
- Press and release key you want to be learned, mode light now remains on.
- Align both remotes by pointing them at each other, with a distance of about 2 inches apart with IR LEDs directly aligned.
- Press and hold the corresponding key on the target remote control until mode light blinks three times, then flashes slowly; means code learned successfully, continue to step 6.a. If unsuccessful - mode light flashes two times quickly & exits from learning mode; this may indicate not enough memory space, please delete some learned keys. Please start over from step 1.
- Repeat steps 3-5 to learn all your needed keys while model light blinks slowly, then
- Press mode key (e.g., TV) to save and exit.
Delete individual learned key
- Press and hold the mode key (e.g., TV) you wish to program for about 3 seconds until the mode light remains on, release the mode key.
- Press and release [MENU] key, the mode key blinks slowly, the remote is now in learning mode.
- Press and hold the key you want to delete learned code from,
- If successful - The mode light blinks three times, remote saves and exits.
- If unsuccessful - The mode light flashes two times and exits.
- Repeat steps 1-3 to delete other learned keys.
Delete all learned keys from a single device
- Press and hold the mode key (e.g., TV) you wish to program for about 3 seconds until the mode light remains on, release the mode key.
- Press and release [MENU] key, the mode key blinks slowly, the remote is now in learning mode.
- Press and hold the mode key you want to delete all learned keys from (e.g., TV) until the mode light blinks three times and exits.
Delete all learned keys from all devices
- Press and hold the mode key (e.g., TV) you wish to program for about 3 seconds until the mode light remains on, release the mode key.
- Input code "9 9 8 8", mode light blinks two times slowly to confirm and exits.
Macro function
Macros allow for multiple keys to transmit with the pressing of one dedicated key. Example, with a single press of the assigned key, the remote could Power on TV, Change input, Volume Increase, Power on Cable Box & Input channel 530.
Setting a Macro Key while in a specific Mode only (Fixed Device)
What is Fixed Device? This setting allows for assigning a macro key to be used while in the designated mode only. Example, if “FAV” key is assigned to “TV” mode to send macros. “FAV” key will operate as normal if remote is in any other mode such as STB, DVD or AUDIO. “FAV” key will only send the assigned macro if remote is in “TV” mode when the key is depressed.
- Press and hold the mode key (e.g., TV) you wish to program for about 3 seconds until the mode light remains on, release the mode key.
- Input code "9 9 5",
- Press key to assign macro function to, the LED flashes once and remains on;
- Press the mode key (e.g., TV), then follow by pressing the keys in order in which you want the remote to transmit them. If you want to change modes during the sequence, press the corresponding mode key (e.g., DVD) in sequence and then continue with pressing remaining keys you wish.
- When complete, Press and hold any Mode key (e.g., TV) for about 3 seconds to save and exit.
Setting a Macro Key that works while in any mode (Non-fixed device)
What is a non-fixed device? This setting allows for always sending the function of the macro key no matter what mode (i.e., TV, DVD, STB, AUDIO) the remote resides.
- Press and hold any mode key (e.g., TV) for about 3 seconds until the mode light remains on, release the mode key.
- Input code "9 9 6",
- Press key to assign macro function to, the LED flashes once and remains on;
- Press the mode key (e.g., TV), then follow by pressing the keys in order in which you want the remote to transmit them. If you want to change modes during the sequence, press the corresponding mode key (e.g., DVD) in sequence and then continue with pressing remaining keys you wish.
- When complete, Press and hold any Mode key (e.g., TV) for about 3 seconds to save and exit.
- Example: Assigning “FAV” key to Power on TV, Change input, Increase volume by 1, Power on Cable Box, Input channel 530. Press the following keys in sequence:
- Hold [TV] for 3 seconds, [9], [9], [6], [FAV], [TV], [POWER], [INPUT], [VOL +], [CBL], [POWER], [5], [3], [0] & finally, press and hold [TV] for 3 seconds to save.
Delete programmed macro key:
Simply skip step 4 from above procedure.
Macro functionality notes:
•This remote allows up to 5 keys having macro functionality.
•This remote can program a maximum of 15 steps per each macro.
•If programming a macro over a previously assigned macro, it will replace it.
Backlight adjustments
Toggle backlighting on/off
- Press and hold any mode key (e.g., TV) for about 3 seconds until the mode light remains on, release the mode key.
- Input code "9 9 8 5".
Toggle backlighting length of time; 3 - 10 seconds
- Press and hold any mode key (e.g., TV) for about 3 seconds until the mode light remains on, release the mode key.
- Input code "9 9 8 6".
Toggle backlighting brightness: 100/75/50/25%
- Press and hold any mode key (e.g., TV) for about 3 seconds until the mode light remains on, release the mode key.
- Input code "9 9 8 7".
Reset to Factory Default Status
- Press and hold any mode key (e.g., TV) for about 3 seconds until the mode light remains on, release the mode key.
- Input code "9 9 9 9"; all mode lights will light and stay lit for about 3 seconds then go out to confirm successful reset.